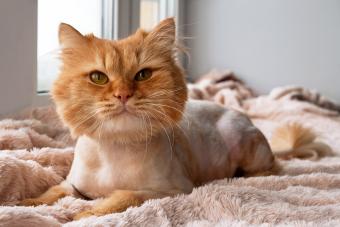
It finally happened. You discovered a clump of matted fur in your cat’s usually-silky-smooth coat. The bad news is that cat mats won’t go away on their own, but the good news is that you can probably take care of them yourself. Follow our fool-proof guide for how to get mats out of cat fur and learn when it’s time to enlist the professionals.
Why Cat Hair Becomes Matted
Why do cats even develop mats in the first place? There are several reasons you might find mats on your cat, even if they've never had one before.
- When your cat sheds, if the loose hairs aren't brushed off, they can get caught in the remaining fur and form mats over time.
- Sometimes, mats can form from too much friction between the area where the mat forms and another surface, such as a neck against a too-tight collar.
- If foreign matter gets stuck in the coat, like cat litter, urine, or dirt, these can lead to mats if your cat licks them and solidifies the mass with their saliva.
- Some cats can't groom themselves well, such as senior and obese cats, and mats can form if your cat is unable to keep themselves clean. This is why mats often form in hard-to-reach areas like their groin, back, and anal area, as well as around the ears and the back of their neck.
Matted hair is painful for your cat and can lead to additional health and behavioral issues if not dealt with.
How to Remove Cat Mats
Depending on how matted the fur is and how cooperative your cat is, you may have luck removing the mats at home. Just start slow and work with your cat rather than against them. If they become anxious, defensive, or even simply wiggly at any point, it's safest to ask your vet or groomer for help.

The Finger-Combing Method
The simplest grooming tools of all are your fingers, but keep in mind this method will only really work on small mats, especially if they've just started to form.
- Before you begin, make sure your cat is relaxed and provide them with lots of positive reinforcement.
- You'll want to start at the end of the mat and slowly make your way down to the skin.
- Gently separate the hairs in the mat using your fingers.
- Be careful not to pull on the mat, which will pull on your cat's skin and can be painful. It's helpful to hold onto the base on the mat to prevent any tension.
Combing Out Mats

Mat removing combs or brushes can be good for small to medium-sized mats. These tools are designed to break up the hair as gently and efficiently as possible to reduce stress on your cat.
- Just like when using your fingers, you want to start toward the top of the hair and break up the mats while slowly making your way down to the sensitive skin area.
- You should hold the mat in one hand to keep it from pulling on the skin as you work the comb with the other hand.
- Be careful not to pull on your cat's skin or scratch them with the comb. Some mat breakers actually have blades in them, which can easily injure your cat's skin.
If you don't have access to a tool made specifically for mats, but you have a wide-toothed comb, this can work well for small mats. You can use it to work on the mats, breaking up a small area near the ends of the hair at a time.
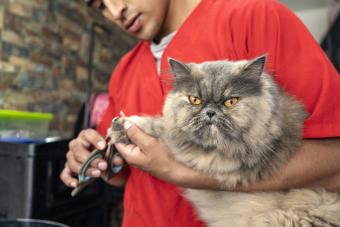
Leave Shaving Mats to the Professionals

Clippers are by far the fastest and best way to get rid of matted cat fur, which is why groomers and veterinarians use this method, but it's far from the safest option. According to Beverly Hills Veterinary Associates, "Shaving a cat is rarely necessary, and it should be handled only by a professional."
Cats have very delicate skin that's prone to nicks and cuts, and the skin can easily rip. Plus, the entire experience of being shaved can be stressful and even traumatizing for a cat. If you're dealing with persistent mats that won't budge with other methods, let the professionals handle them.
Never Use Scissors on Mats
While it may seem very tempting to use grooming scissors to cut out your cat's mats, this is never a good idea. Even the slightest wiggle can result in your pet getting cut with the scissors. It's also very hard to know where the cat's fur ends and their skin begins. So skip the scissors and grab a comb or mat brush instead.
At-Home Mat Removing Schedule

Mats can be stubborn, and cats can be impatient, so it's often best to take things slow and establish a mat-removing schedule. This can allow you to work through your cat's mats over the course of a week, then fall into a maintenance routine to prevent these suckers in the future.
Day 1: Prep
Think of day 1 as your initial assessment. This is when you'll inspect your cat's fur and collect all necessary supplies.
- Do a once-over to locate all the mats. Make sure you feel around your cat's neck, chest, base of the tail, and legs.
- Get your cat used to you touching the mats and check to see if there are wounds or sores under them. If you do notice any, see your vet.
- Gather all your supplies, like a comb and detangling spray.
Day 2: Brush the Non-Matted Hair
Get your cat used to the tools by brushing through their unmatted hair.
- Give your cat a once-over with whatever comb or brush you plan to use on the mats.
- This can help you locate any hidden or deep mats.
- If you plan to use a detangler or powder, put a bit on your hand and let your cat smell it so it becomes familiar.
Day 3: Small Mats
On day 3, you'll start to tackle the small mats.
- Start with a small section and work through them using your fingers or wide-toothed comb.
- Work for a few minutes at a time, and give your cat plenty of praise, pets, and treats throughout.
- Try out any detangling solutions on these small mats.
Day 4: Larger Mats
If you were able to remove a few of the smaller mats on day 3, it's time to move onto larger mats. If not, repeat yesterday's task.
- Tackle larger mats using a combo of detanglers and combs.
Day 5: Hard to Reach Mats
Most cats don't like being touched in certain areas, like their belly or groin. If your cat has mats in these areas, you can begin to move on these.
- Groom in a well-lit room so you can see exactly what you're doing.
- Work through the mats for a few minutes at a time, giving your cat breaks in between and lots of praise.
Day 6: Reassess the Mats
Do a once-over of your cat's fur to see if any mats remain. Part the hair to look at the skin to check for areas of irritation from the mats that need veterinary attention.
Day 7: Start a Maintenance Routine
With all or most of your cat's mats gone, you can establish a routine that'll help prevent future mats.
- Give your cat a good brush all over to remove any loose hairs or debris.
- Make it a positive experience with a lot of praise.
- Moving forward, plan to brush your cat every week or a few times each week if they have long or tangle-prone hair.
RELATED: Tips for Detangling Long-Haired Cats
More Helpful Solutions
Along with the standard tools to do the actual mat removal, there are a few store-bought and homemade solutions that can help you fight those nasty hair clumps. A few of them use ingredients you probably have in your home already!
Mat Removal Formulas
If you're going to pick apart the mats or use a rake or comb, adding in a detangling solution can help make the job go faster and easier for your kitty. TropiClean Tangle Remover and EQyss Grooming Survivor Pet Detangler are two examples of pre-mixed solutions you can buy that help to break up the mats.
Only use commercial detangling products that are designed for cats.
Try Oils
Instead of purchasing a pre-mixed detangling formula, you can try applying a small amount of cat-safe oil to the mats to help remove them. Some commonly used options are coconut oil, or olive oil.
The oil should sit in the cat's fur and soak into the mat for at least an hour or longer to give it a chance to work on the mat. Keep your cat from licking it off while the oil soaks in. These will work on small mats, but the larger the mat, the more likely you'll need to see a professional.
Apply Powders
Both baby powder and corn starch are often used by cat owners to break up mats. All you need to do is put a small amount on the mat and use your fingers to move the powder into the mats to break them up.
You can brush the excess powder out once the mat is gone. The downside to these products is the chance of your cat ingesting them and developing an upset stomach, so you may want to bathe them immediately once the mat is removed.
When to See a Professional
If the mats are simply too large or you don't have the right tools, your best course of action is to bring them to a professional groomer. If you notice any of the following, you should see your vet for help:

- Severe matting close to the skin or all over the body
- Red skin, sores, or wounds under the mats
- Signs of parasites or infection
- Aggression or pain while trying to remove mats
- Your cat doesn't appear to be grooming themselves
Dealing With Matted Cat Fur
Mats can crop up super quickly, so don't beat yourself up if you notice one on your cat. The best course of action is to remove it as soon as you can and prevent any more from forming. Develop a regular brushing schedule and be sure to check your cat's fur all over to make sure no mats are forming.